Fencing Installation Guide
How to Install Fence Panels and Gravel Boards
A well-installed fence depends on accurate post spacing, secure foundations and correctly fitted panels and gravel boards. This guide explains the main installation sequence for timber, concrete and compatible metal post systems.
In this guide
Installation Overview
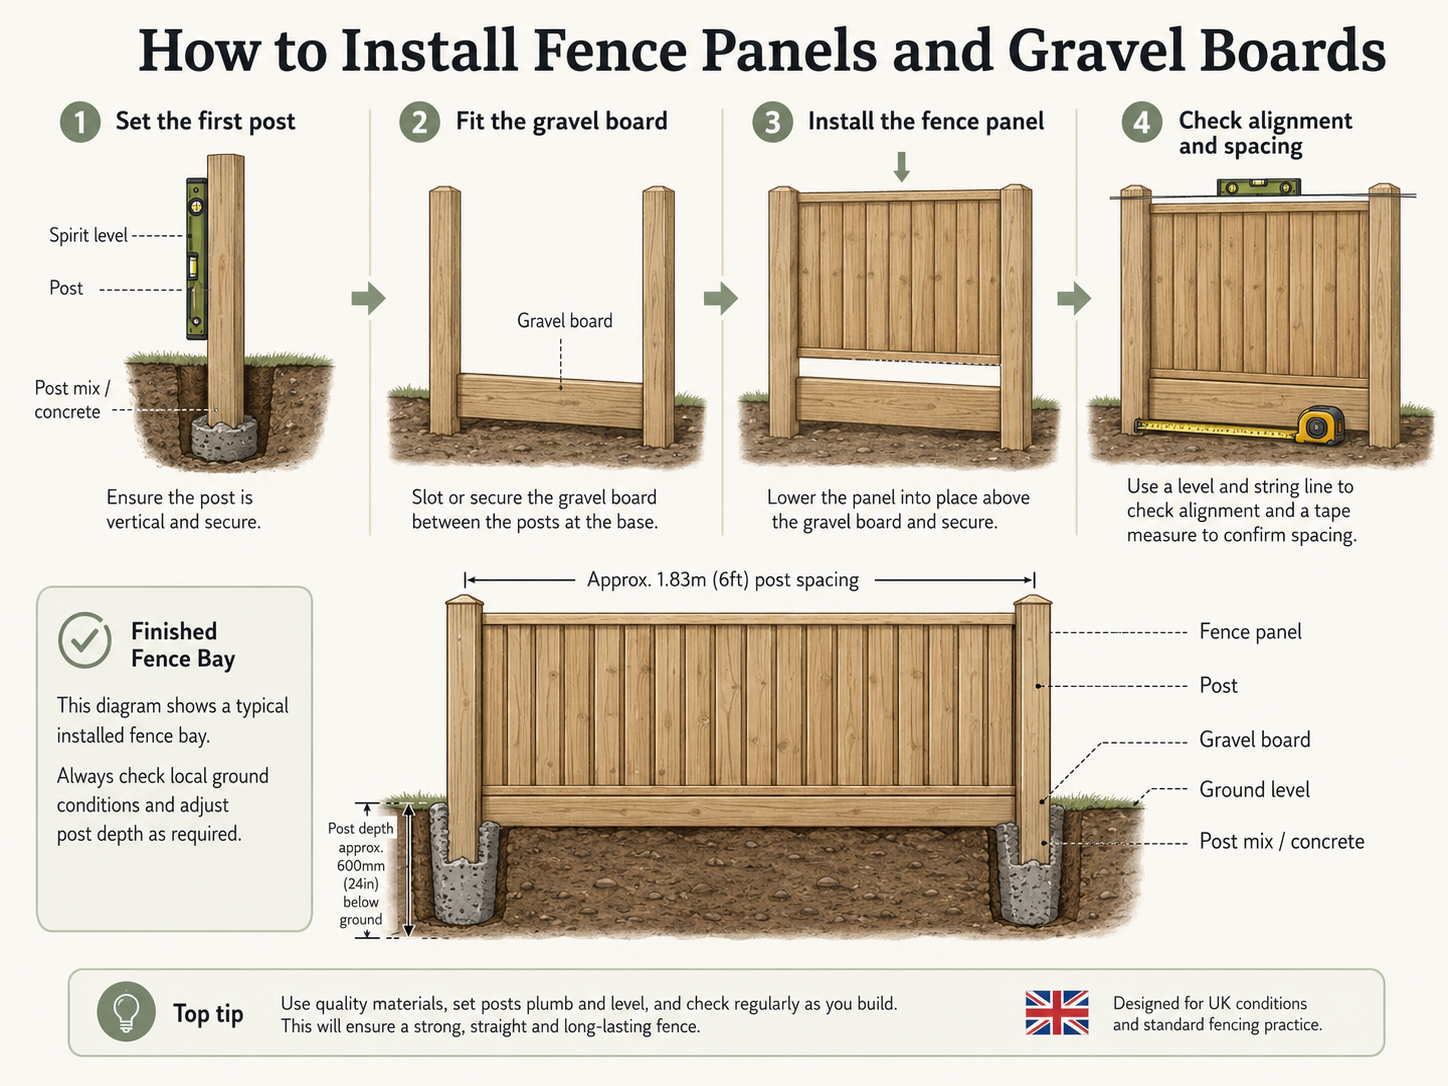
This diagram shows the typical sequence for installing a fence panel and gravel board between posts. The exact method will vary depending on whether you are using timber, concrete or DuraPost metal posts.
Before You Begin
A successful fence installation starts with careful preparation. Before digging any holes, confirm the fence line, check the product sizes and make sure all materials are compatible.
You will normally need:
- Tape measure
- String line
- Marker pegs
- Spirit level
- Post-hole spade or auger
- Shovel
- Post mix or suitable concrete
- Timber supports or temporary braces
- Drill and suitable fixings
- Saw, where timber components need cutting
- Protective gloves
- Eye protection
- A second person for heavy panels, concrete posts and gravel boards
Before starting:
- Confirm the correct boundary
- Check for underground cables, pipes and drainage
- Measure the actual panels and gravel boards
- Check the post lengths and profiles
- Confirm all corner, end and intermediate posts
- Check the weather forecast
- Make sure there is safe access for materials and tools
Do not rely only on nominal product sizes. Measure the components you are using before setting the post spacing.
Planning the Fence Line
Mark the full fence line before installing any posts.
Place a peg at each end of the run and stretch a string line between them. The string should show the face or centre line of the posts, depending on the system being installed.
Mark:
- Corners
- Gate openings
- Changes in direction
- Changes in height
- Sloping sections
- Areas with restricted access
- Existing walls or structures
Measure each straight run separately.
Before digging, check that:
- The line is straight
- Gate positions are correct
- The fence remains within the boundary
- Panels will not clash with walls, trees or buildings
- Ground levels have been considered
- Post centres match the actual panel and post system
Keep the string line in place during installation so that the posts remain aligned.
Setting the First Post
The first post establishes the position, height and alignment for the rest of the fence.
Dig the first post hole to the required depth and width. The hole must be large enough to allow the post to be adjusted and surrounded by a suitable amount of post mix or concrete.
Place the post in the hole and check:
- It is vertical in both directions
- It aligns with the string line
- The correct amount remains above ground
- The slot or fixing face is pointing in the right direction
- It is suitable for the first panel, corner or end position
Use temporary braces to hold the post while the post mix or concrete is added.
Check the post again with a spirit level before the material begins to set.
A small error in the first post can affect the entire fence run, so take time to position it accurately.
Measuring the Post Spacing
Post spacing must be based on the actual panel, post and fixing arrangement.
For timber posts, the spacing may need to allow for:
- Panel width
- Brackets or clips
- Expansion or fitting clearance
- The thickness of any gravel-board cleats
For slotted concrete posts, measure between the slots rather than only between the post centres.
For DuraPost systems, allow for:
- Post profile
- Cover strips or infills
- Brackets
- Panel thickness
- Gravel-board arrangement
- Manufacturer-specific clearances
A common mistake is to set several posts before checking whether the first panel fits correctly.
A safer sequence is:
- Set the first post
- Position the gravel board or spacing guide
- Position the next post
- Check the panel fit
- Secure the second post
- Repeat one bay at a time
This method reduces the chance of spacing errors building up along the fence.
Installing Timber Posts
Timber posts are commonly used with panel clips, brackets, cleats or direct fixings.
Installation sequence
- Dig the post hole.
- Place the post in position.
- Align it with the string line.
- Check it is vertical in both directions.
- Brace it securely.
- Add post mix or concrete.
- Recheck the level and height.
- Allow the foundation to set as required.
- Fit the gravel board supports.
- Fix the panel using suitable external-grade fixings.
Important points
- Use pressure-treated posts suitable for ground contact.
- Avoid damaging the treatment unnecessarily.
- Treat any cut ends with a suitable preservative.
- Do not allow the post to sit in a poorly drained pocket.
- Use fixings suitable for treated timber and outdoor exposure.
- Keep the post face consistent throughout the fence run.
Timber posts can be easier to adjust and fix into than concrete posts, but careful installation and drainage remain important.
Installing Concrete Posts
Concrete posts are heavy and usually require at least two people to handle safely.
Slotted concrete posts are commonly installed with fence panels and gravel boards that slide into the post slots.
Installation sequence
- Dig the first hole to the required depth.
- Lower the concrete post into position.
- Check that the correct slot faces the panel run.
- Brace the post securely.
- Add post mix or concrete.
- Check height, alignment and level.
- Position the gravel board.
- Use the gravel board or a measured spacer to position the next post.
- Check the panel will fit before securing the next post.
- Continue one bay at a time.
Important points
- Wear gloves and use safe lifting methods.
- Do not drag or drop posts onto hard surfaces.
- Check for cracks or damage before installation.
- Make sure corner and end posts are in the correct positions.
- Keep the slots clear of concrete and debris.
- Do not force a panel into a space that is too tight.
Concrete gravel boards are also heavy and should be handled carefully.
Installing DuraPost Metal Posts
DuraPost metal posts provide a lighter alternative to concrete and use dedicated profiles, brackets, infills and accessories.
Before installation, check that you have:
- The correct post profile
- Intermediate, end or corner posts where required
- Compatible panel brackets
- Gravel-board supports
- Cover strips or infills
- Post caps
- Suitable fixings
- The required finish or colour
Installation sequence
- Mark the post position.
- Dig the hole to the required depth.
- Place the post in position.
- Check the profile faces the correct direction.
- Align the post with the string line.
- Check it is vertical.
- Brace the post.
- Add post mix or concrete.
- Fit the gravel-board brackets or supports.
- Install the panel using the correct DuraPost fixings.
- Fit cover strips, infills and caps after alignment has been checked.
Important points
- Use the correct accessories for the chosen post profile.
- Do not drill unnecessary holes through the protective finish.
- Follow the fixing arrangement intended for the system.
- Protect powder-coated surfaces from damage during installation.
- Use the correct post for corners, ends and exposed locations.
For taller or more exposed fences, check whether a heavier post profile is required.
Fitting Gravel Boards
Gravel boards sit below the fence panels and help protect timber from direct contact with soil and moisture.
They also:
- Raise the panel above ground level
- Improve the finished appearance
- Make panel replacement easier
- Help retain small changes in ground level
- Support the bottom edge of the fence bay
Timber gravel boards
Timber gravel boards are lighter and easier to cut. They can be fixed to timber posts using cleats, brackets or suitable screws.
Check that:
- The board is pressure treated
- Cut ends are retreated
- It remains clear of standing water
- It is level or stepped consistently
- The fixings are suitable for external use
Concrete gravel boards
Concrete gravel boards are commonly used with slotted concrete posts.
They are normally lowered into the slots before the fence panel.
Check that:
- The board is the correct width
- The thickness fits the post slots
- It is supported evenly
- It is not forced into position
- It is handled safely by two people where necessary
DuraPost-compatible gravel boards
Use brackets and supports designed for the metal post system.
Check compatibility between:
- The gravel board
- The post profile
- The brackets
- The panel
- The cover strips or infills
Installing Fence Panels
Once the posts and gravel board are correctly positioned, the fence panel can be installed.
Before fitting the panel:
- Check the opening width
- Confirm the panel height
- Make sure the gravel board is secure
- Check the panel is the correct way round
- Inspect the panel for damage
- Confirm the fixing method
With timber posts
Panels can normally be fixed using:
- Panel clips
- L brackets
- Timber cleats
- Suitable exterior screws
Use enough fixings to secure the panel without splitting the frame.
With slotted concrete posts
Lower the panel carefully into the post slots above the gravel board.
Do not:
- Drop the panel
- Force it into a tight opening
- Twist the post to make it fit
- Lift heavy panels alone
With DuraPost metal posts
Use the correct brackets and fixings for the post system.
Fit the panel squarely, then add any cover strips or infills after the alignment has been checked.
After fitting each panel:
- Check the top line
- Check the panel is level
- Confirm the posts remain vertical
- Check the spacing before moving to the next bay
Working on Sloping Ground
On sloping ground, fence panels are usually installed using one of three methods:
Stepped panels
Each panel remains level, with each bay stepping up or down the slope.
This is common with standard framed panels.
Raked or sloping panels
The panel follows the slope.
This may be possible with closeboard fencing, individual boards or purpose-made panels.
Adjusted ground levels
Small ground variations may be managed using:
- Different gravel-board heights
- Cut gravel boards
- Small steps
- Ground preparation
When stepping panels:
- Keep each panel level
- Use consistent step heights where possible
- Check the finished height on both sides
- Make sure no large gaps remain below the gravel boards
- Allow for longer posts where the ground falls away
Do not set all post tops to the same height without first deciding how the fence will follow the slope.
Common Installation Mistakes
Avoid these common problems:
- Failing to confirm the boundary line
- Not checking for underground services
- Setting several posts before testing the panel fit
- Measuring nominal rather than actual panel dimensions
- Installing the first post out of level
- Using the wrong concrete corner or end post
- Using the wrong DuraPost profile or accessory
- Installing posts too shallowly
- Failing to brace posts while the foundation sets
- Allowing concrete to block post slots
- Forcing panels into openings that are too narrow
- Forgetting to allow for gravel-board height
- Installing timber panels directly against soil
- Failing to retreat cut timber
- Ignoring wind exposure
- Lifting heavy concrete products without help
- Allowing spacing errors to accumulate along the run
Final Checks
Before finishing the installation, check:
- Every post is vertical
- The fence follows the planned line
- Panel tops are level or stepped consistently
- Gravel boards are secure
- Panels are fixed correctly
- DuraPost infills, caps and covers are fitted
- Timber cut ends have been treated
- No fixings are loose or protruding
- Gate openings remain the correct size
- Concrete and post mix have cured sufficiently
- The surrounding ground drains properly
- Waste and debris have been removed
Walk along both sides of the fence and check the finished appearance from a distance.
Small alignment problems are easier to spot before the installation is fully complete.
Need Help Checking Your Measurements?
Bring your measurements, photographs and project details into our Harlow store. Our team can help you choose compatible posts, panels, gravel boards, brackets, post mix and fixings.
Before You Start
- Confirm the boundary line
- Check for underground services
- Measure the panels and gravel boards
- Confirm the correct post spacing
- Check all post and panel types
- Arrange help for heavy components
- Check the weather and ground conditions
Need Help with Your Measurements?
Bring your measurements, photographs and a simple sketch into our Harlow store. Our team can help calculate the panels, posts, gravel boards and fixings required.